ConstraintLayout
ConstraintLayout은 ViewGroup을 상속받아 확장시킨 라이브러리 입니다. 지난 2017년 2월에 1.0 버전이 출시되어 많은 개발자들이 이 라이브러리를 유용하게 써왔습니다. 출시때는 Android API9 수준까지 지웠했었는데요, 2.0부터는 API 14 수준부터 지원하게되었습니다. 사실상 API 14이상만되어도 안드로이드 전체 이용자 99.9%가 이에 해당하기 때문에 특수한 개발목적 또는 환경을 제외하고는 범용적으로 쓰일 수 있는 라이브러리입니다.
ConstraintLayout 왜 써야하죠?
ConstraintLayout 이전의 레이아웃들도 멋지고 아름다운 UI를 표현할 수 있었습니다. 하지만 개발자들은 그것들을 표현하기위해 골치가 아팠고, 다양한 비율과 해상도까지 지원하려면 어쩔 수 없이 같은이름으로 해당 조건에 해당하는 여러벌의 레이아웃을 만들어야 했습니다. 이는 생산성과 유지보수를 힘들게 했습니다. 심지어 복잡한 레이아웃의 경우 여러계층의 구조로 만들어야하다 보니 깊이가 깊어지고 이해하기가 점점 힘들었었습니다. ConstraintLayout은 이런 어려움들을 모두 해결해줍니다. 하나의 레이아웃으로 다양한 유스케이스에 대응이되며, 단순한 계층 구조로 이해하기도 쉽고, flat한 구조를 유지한다면 뷰를 그리는 퍼포먼스 향상은 덤으로 얻어갈 수 있습니다.
현재 ConstraintLayout이 지원하는 기능
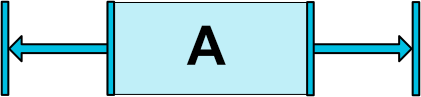
Relative Positioning (상대적 배치)
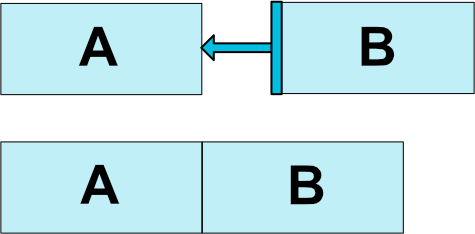
상대적인 배치는 RelativeLayout과 흡사하며 ConstraintLayout에 가장 기본적인 기능입니다. 이 기능은 View와 View간의 제약조건을 통해 위치를 결정짓게 됩니다.
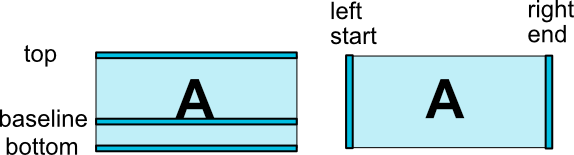
가로축 상의 배치는 left, right, start 그리고 end 속성으로 할 수 있으며, 세로축 상의 배치는 top, bottom 그리고 text에 한해서 baseline을 지정할 수 있습니다.
일반적으로 아래와 같은 콘셉을 가지고 View를 배치 합니다.
<androidx.constraintlayout.widget.ConstraintLayout ...>
    <Button android:id="@+id/buttonA" ... />
    <Button android:id="@+id/buttonB" ...
            app:layout_constraintLeft_toRightOf="@+id/buttonA" />
</androidx.constraintlayout.widget.ConstraintLayout>
코드를 확인해보자. buttonB의 왼쪽편을 buttonA의 오른쪽에 배치하라는것을 알 수 있다.
이것 외에도 많은 배치 방법들이 있으니 확인해보자
layout_constraintLeft_toLeftOflayout_constraintLeft_toRightOflayout_constraintRight_toLeftOflayout_constraintRight_toRightOflayout_constraintTop_toTopOflayout_constraintTop_toBottomOflayout_constraintBottom_toTopOflayout_constraintBottom_toBottomOflayout_constraintBaseline_toBaselineOflayout_constraintStart_toEndOflayout_constraintStart_toStartOflayout_constraintEnd_toStartOflayout_constraintEnd_toEndOf
만약 buttonB입장에서 부모뷰인 ConstraintLayout에 관련하여 배치를 하고 싶다면 id대신 parent 키워드를 사용하면 됩니다.
<Button android:id="@+id/buttonB" ...
        app:layout_constraintLeft_toLeftOf="parent" />
Margins (여백)
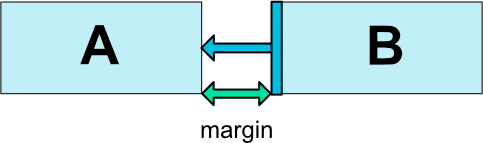
만약 여백을 주고 싶다면 margin을 이용하면 됩니다. 여백에 들어가는 값은 오직 0 또는 양수값만 적용할 수 있습니다.
여백을 줄 수 있는 다양한 방법입니다.
android:layout_marginStartandroid:layout_marginEndandroid:layout_marginLeftandroid:layout_marginTopandroid:layout_marginRightandroid:layout_marginBottom
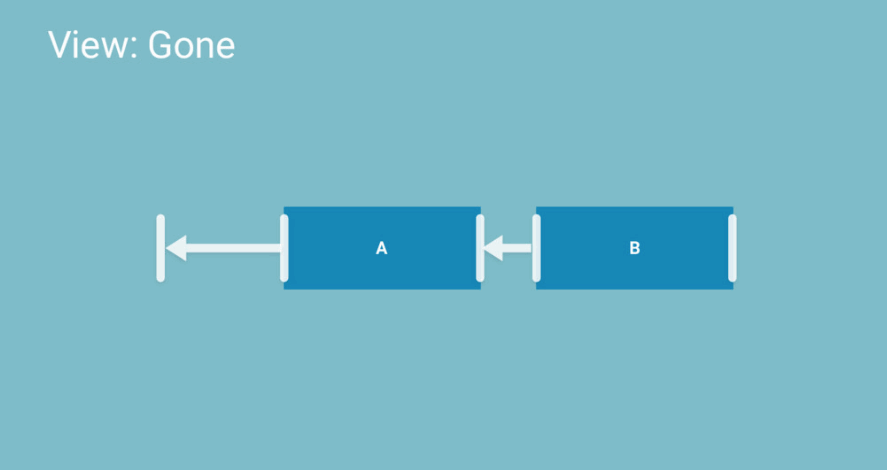
연결되었던 뷰의 가시성(Visibility)이 숨김상태(GONE)일 때에 대한 여백을 따로 적용하고 싶을때가 있습니다. 아래의 그림을 확인하시기 바랍니다.
 (출처:Realm 아카데미 블로그)
연결된 View가 숨겨질 때의 여백에 대한 속성은 다음과 같습니다.
layout_goneMarginStartlayout_goneMarginEndlayout_goneMarginLeftlayout_goneMarginToplayout_goneMarginRightlayout_goneMarginBottom
Centering positioning (중앙 배치)
만약 View를 중앙정렬하고 싶다면 다음과 같이 배치하면됩니다.
<androidx.constraintlayout.widget.ConstraintLayout ...>
    <Button android:id="@+id/button" ...
            app:layout_constraintLeft_toLeftOf="parent"
            app:layout_constraintRight_toRightOf="parent/>
</androidx.constraintlayout.widget.ConstraintLayout ...>
bias라는 속성이 있는데 이를 통해서 이미 정렬된 View를 한쪽으로 치우치게 만들 수도 있습니다.

중앙으로 배치된 A를 왼쪽으로 30% 치우치게 만든 모습.
<androidx.constraintlayout.widget.ConstraintLayout ...>
    <Button android:id="@+id/button" ...
            app:layout_constraintHorizontal_bias="0.3"
            app:layout_constraintLeft_toLeftOf="parent"
            app:layout_constraintRight_toRightOf="parent/>
</androidx.constraintlayout.widget.ConstraintLayout>
bias의 기본값은 0.5 (50%) 입니다. 세로축 및 가로축 기준으로 치우치게 만들 수 있으며 다음과 같은 속성을 사용합니다.
layout_constraintHorizontal_biaslayout_constraintVertical_bias
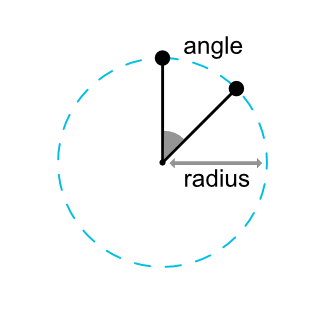
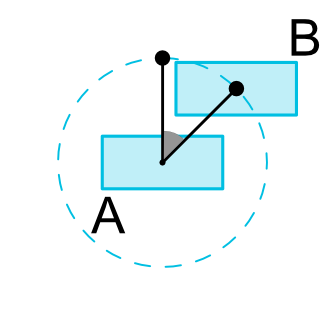
1.1버전에서 추가된 Circular positioning (원형 배치)
한 View의 중점을 기준으로 다른 View의 중점을 배치 할 수 있습니다. 각도와 거리의 값이 필요하며 뷰가 배치될 수 있는 곳을 이으면 원이 됩니다.
<androidx.constraintlayout.widget.ConstraintLayout ...>
    <Button android:id="@+id/buttonA" ... />
        <Button android:id="@+id/buttonB" ...
            app:layout_constraintCircle="@+id/buttonA"
            app:layout_constraintCircleRadius="100dp"
            app:layout_constraintCircleAngle="45" />
</androidx.constraintlayout.widget.ConstraintLayout>
사용하는 속성은 다음과 같습니다.
layout_constraintCircle: 기준으로 참조할 View의 idlayout_constraintCircleRadius: 참조한 View와의 거리(반지름)layout_constraintCircleAngle: 0부터 360까지 참조한 뷰로부터의 각도
Visibility behavior (가시성에 따른 동작)
이미 여백(Margin)기능을 보면서 느끼셨겠지만, ConstraintLayout내의 연결된 View들간에서 하나의 View가 숨겨지면(GONE) ConstraintLayout에서 특정 처리를 하도록 되어있습니다.
GONE된 View는 표시되지도 않고 레이아웃의 일부로 취급되지도 않지만 위치나 치수를 계산하는 측면에서는 여전히 의미가 있습니다.
레이아웃이 사이즈를 계산하고 그리기 위해서는 GONE된 View는 기본적으로 하나의 점처럼 취급됩니다. 다른 View에 제약조건이 있다면 여전히 영향을 미칠테지만 기본적으로 여백(Margin)은 0입니다.
이러한 동작을 사용하면 레이아웃을 해치지 않는선에서 간단한 레이아웃 애니메이션을 수도 있습니다.
Dimension constraints (크기 및 치수에 대한 제약조건)
ConstraintLayout내에서 최소값 최대값을 정의 할 수도 있습니다.
android:minWidth최소 가로 길이android:minHeight최소 세로 길이android:maxWidth최대 가로 길이android:maxHeight최대 세로 길이
이 속성들은 ConstraintLayout내에서만 사용가능하고, android:layout_width 및 android:layout_height에 대한 값이 WRAP_CONTENT로 지정 되어있어야 합니다.
View의 가로 세로 사이즈(android:layout_width, android:layout_height)는 크게 3가지 방식으로 결정됩니다.
- 수치를 집적 입력할때 (예를들면 100dp 라고 직접입력하는경우)
- WRAP_CONTENT를 통해 View스스로 사이즈를 결정 지을 때
- 0dp를 입력하고 제약조건에의해 사이즈를 결정지을 때. (0dp = MATCH_CONSTRAINT)
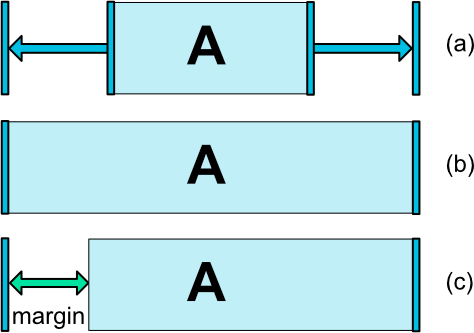
위의 그림을 보면 (a)의 가로 길이는 WRAP_CONTENT로 스스로 사이즈를 결정 지었고, (b)의 가로길이는 0dp이며, 좌우측이 부모뷰에 제약이 걸려 부모뷰의 길이와 같게 늘어난 상태입니다. (c)도 b와 같이 0dp이지만 여백값이 적용된 모습입니다.
ConstraintLayout에서 제약조건 이용시 MATCH_PARENT를 사용하지 않는것을 추천합니다. 대신 left/right 또는 top/bottom 제약조건과 함께 MATCH_CONSTRAINT를 이용하시기 바랍니다.
1.1 버전에서의 WRAP_CONTENT
만약 사이즈에 WRAP_CONTENT를 지정한다면 1.1버전이전에는 말그대로 View스스로 콘텐츠의 사이즈를 동적으로 결정 지었습니다. 일반적으로는 문제가 되지 않았으나, 문제가 되는 케이스가 있었습니다. 예를들면 TextView와 Button을 가로로 배치할 때입니다.
- 조건1. TextView의 Text가로 길이는 가변적이고 Button은 고정적입니다.
- 조건2. TextView는 좌상단에 배치하고, Button은 TextView오른쪽편에 딱 붙어야 합니다.
<?xml version="1.0" encoding="utf-8"?>
<androidx.constraintlayout.widget.ConstraintLayout xmlns:android="http://schemas.android.com/apk/res/android"
    xmlns:app="http://schemas.android.com/apk/res-auto"
    android:layout_width="match_parent"
    android:layout_height="match_parent">

    <TextView
        android:id="@+id/text1"
        android:layout_width="wrap_content"
        android:layout_height="wrap_content"
        android:background="@color/colorAccent"
        android:ellipsize="end"
        android:maxLines="1"
        android:text="Hello World!!"
        app:layout_constraintEnd_toStartOf="@+id/button1"
        app:layout_constraintHorizontal_bias="0"
        app:layout_constraintHorizontal_chainStyle="packed"
        app:layout_constraintStart_toStartOf="parent"
        app:layout_constraintTop_toTopOf="parent" />

    <Button
        android:id="@+id/button1"
        android:layout_width="wrap_content"
        android:layout_height="wrap_content"
        android:text="button1"
        app:layout_constraintEnd_toEndOf="parent"
        app:layout_constraintStart_toEndOf="@+id/text1"
        app:layout_constraintTop_toTopOf="parent" />

</androidx.constraintlayout.widget.ConstraintLayout>

Text가 짧을 때는 아무문제가 없어보입니다. 하지만 Text의 길이가 늘어난다면 어떻게 될까요?

TextView의 긴 가로 길이 때문에 버튼이 레이아웃 밖으로 빠져나간 모습입니다.
버튼을 레이아웃 밖으로 밀려나가지 않게 하기위해서는 다음 속성을 사용합니다.
app:layout_constrainedWidth=”true|false”app:layout_constrainedHeight=”true|false”
실제로 layout_constrainedWidth속성을 사용할 때 어떻게 되는지 확인해보겠습니다.
<?xml version="1.0" encoding="utf-8"?>
<androidx.constraintlayout.widget.ConstraintLayout xmlns:android="http://schemas.android.com/apk/res/android"
    xmlns:app="http://schemas.android.com/apk/res-auto"
    android:layout_width="match_parent"
    android:layout_height="match_parent">

    <TextView
        android:id="@+id/text1"
        android:layout_width="wrap_content"
        android:layout_height="wrap_content"
        android:background="@color/colorAccent"
        android:ellipsize="end"
        android:maxLines="1"
        android:text="Hello World!! My Name is Charles. Nice to Meet ya!!."
        app:layout_constrainedWidth="true"
        app:layout_constraintEnd_toStartOf="@+id/button1"
        app:layout_constraintHorizontal_bias="0"
        app:layout_constraintHorizontal_chainStyle="packed"
        app:layout_constraintStart_toStartOf="parent"
        app:layout_constraintTop_toTopOf="parent" />

    <Button
        android:id="@+id/button1"
        android:layout_width="wrap_content"
        android:layout_height="wrap_content"
        android:text="button1"
        app:layout_constraintEnd_toEndOf="parent"
        app:layout_constraintStart_toEndOf="@+id/text1"
        app:layout_constraintTop_toTopOf="parent" />
</androidx.constraintlayout.widget.ConstraintLayout>

버튼이 레이아웃 밖으로 빠져나가지 않는 것을 확인 하실 수 있습니다.
1.1에서 추가된 MATCH_CONSTRAINT의 기능
가로,세로 길이 입력하는 부분에 0dp(=MATCH_CONSTRAINT)을 적용할 때, 기본적인 동작은 MATCH_PARENT처럼 공간을 부모뷰에 맞게 꽉채우게 됩니다. 하지만 몇몇 속성과 같이 쓴다면 기능이 좀 달라집니다.
layout_constraintWidth_minandlayout_constraintHeight_min: WRAP_CONTENT처럼 동작하나 최소값을 가짐layout_constraintWidth_maxandlayout_constraintHeight_max: WRAP_CONTENT처럼 동작하나 최대값을 가짐layout_constraintWidth_percentandlayout_constraintHeight_percent: 0에서 1까지 float 값을 입력하여 비율적으로 길이를 결정
만약 뷰의 가로와 세로의 비율을 결정하고 싶다면 아래의 속성을 이용하시면 됩니다.
- layout_constraintDimensionRatio
<Button android:layout_width="wrap_content"
        android:layout_height="0dp"
        app:layout_constraintDimensionRatio="1:1" />
다음과 같은 코드를 입력하면 가로사이즈 기준으로 정방형의 버튼을 표현할 수 있습니다.
가로 세로를 둘다 MATCH_CONSTRAINT로 적용하는경우 제약조건에 만족하면서 최대한의 크기로 늘려지게 된다. 이때 가로 세로 비율을 결정하고 싶은데 세로기준 또는 가로기준으로 비율을 정하고 싶다면 “H” 또는 “W”를 붙이고 콤마(,)를 찍은뒤 비율을 적어주면됩니다.
<Button android:layout_width="0dp"
        android:layout_height="0dp"
        app:layout_constraintDimensionRatio="H,16:9"
        app:layout_constraintBottom_toBottomOf="parent"
        app:layout_constraintTop_toTopOf="parent"/>
다음과 같이 코드를 작성하면 세로길이기준으로 16:9인 버튼이 레이아웃에 꽉 차게 됩니다.

Chains (뷰끼리 연결하기)
Chain은 뷰간의 상호 참조 연결을 할 때, 뷰들을 어떤 방식으로 연결 시킬 시켜 표현 할지를 결정 합니다.
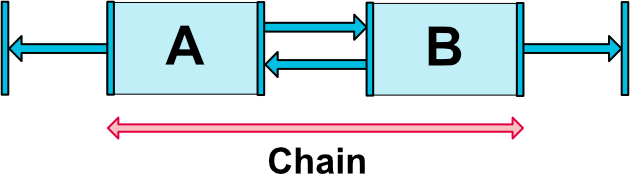
Chain속성을 통해 연결을 할때 할때는 수평기준 가장 왼쪽 있는 View 또는 수직 기준으로 가장 상단에 있는 View가 기준(Head)이 됩니다.
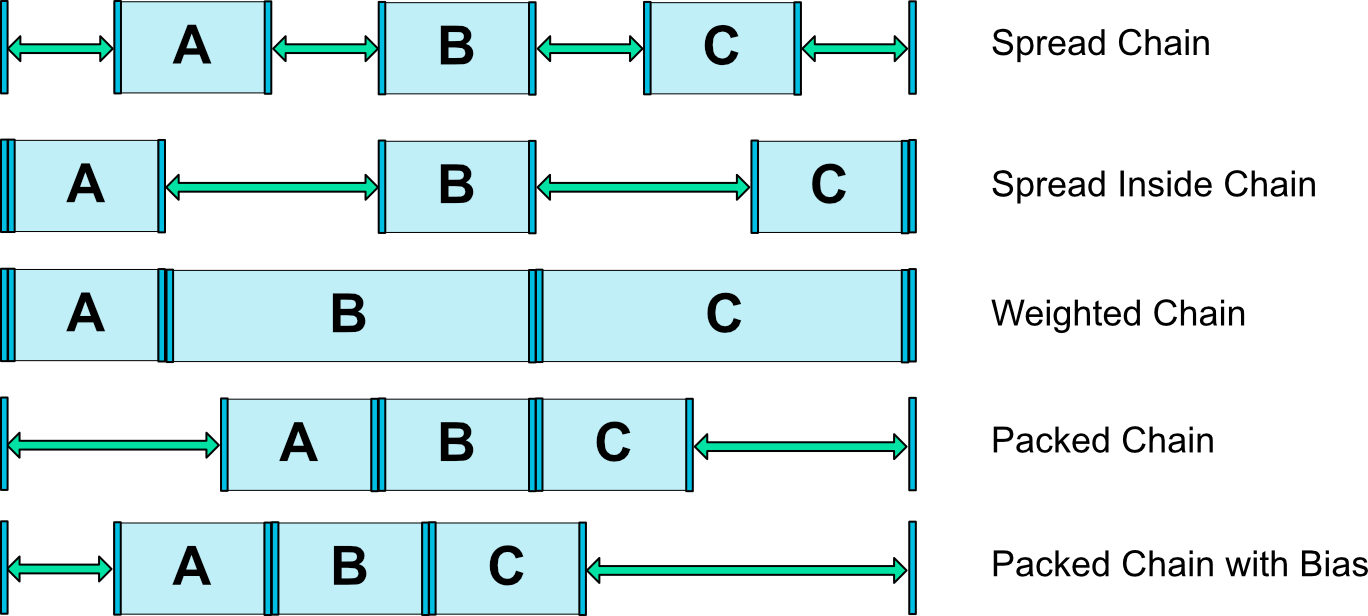
chain 스타일은 여러 형태가 존재 할 수 있는데 layout_constraintHorizontal_chianStyle 또는 layout_constraintVertical_chainStyle을 연결된 뷰들의 head에만 적어주면 됩니다. 기본 chain스타일은 CHAIN_SPREAD입니다.
CHAIN_SPREAD뷰들을 골고루 펼쳐 여백을 같게 합니다(기본값)CHAIN_SPREAD에서의 Weighted chain은 만약 뷰의 길이가 0dp로 지정되어있다면 남은 공간을 수치만큼 비율적으로 나눠갖습니다.CHAIN_SPREAD_INSIDECHAIN_SPREAD와 비슷하지만 가장 외곽에 있는 뷰들은 부모 뷰와 여백이 없는 상태로 골고루 펼쳐집니다.CHAIN_PACKED뷰들이 똘똘 뭉치게 되고 부모뷰로부터의 여백을 같게 합니다. 여백을 조정하고 싶다면 bias조정을 통해 한쪽으로 치우치게 만들 수 있습니다.
이번 시간은 여기까지입니다. 가상 오브젝트를 통해서 좀더 다양한 레이아웃을 꾸며보고 싶다면 Part2를 참조해보시기 바랍니다. 감사합니다.
5개의 댓글
knoow · 2019년 8월 22일 3:12 오후
한글로 정리된 ConstraintLayout 관련 포스팅 글 중에 가장 잘 정리된 글인듯하네요.
잘 봤습니다~
Charlezz · 2019년 9월 4일 9:05 오후
감사합니다
나무 · 2020년 2월 23일 4:14 오후
ConstraintLayout에 처음 접근하기에 유용한 포스팅인 것 같습니다. 잘 읽었습니다 🙂
강범석 · 2021년 8월 18일 3:19 오후
압도적 감사합니다 덕분에 한시간 반동안 헤메던거 풀었습니다..!
성빈 · 2022년 12월 3일 7:08 오후
좋은 글 감사합니다!