Prerequisite : 이미지의 이진화, 윤곽선 검출, 윤곽선 근사화, 투시 변환, OCR
개요
이번 장에서는 간단한 문서 인식 앱을 만들어본다. 현재까지 공부한 내용을 잘 짜집기 하면 만들 수 있는 내용이다. 하나씩 분할 정복을 통해 목표에 접근해보자.
Divide n Conquer
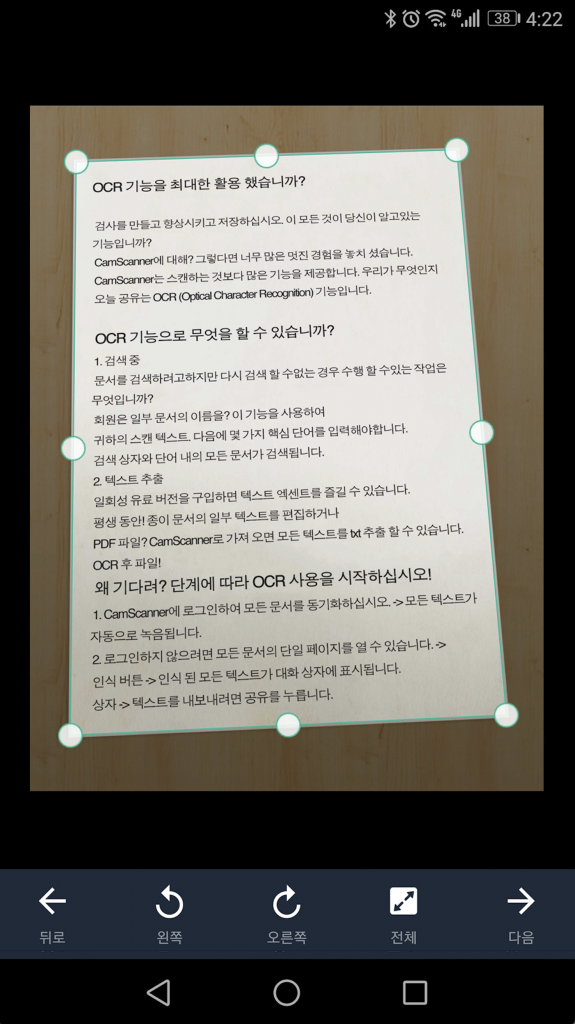
위 그림과 같은 앱을 만들기 위해서는 다음과 같은 과정을 거쳐야 한다.
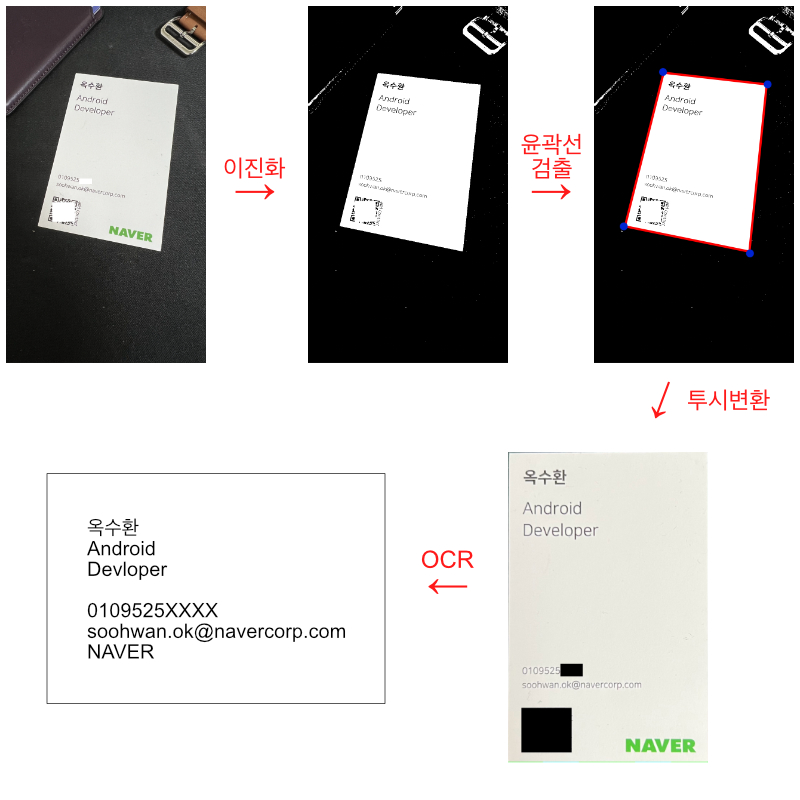
1. 이진화
이진화를 위해서 원본 영상을 먼저 흑백영상으로 변환한다. 그런 뒤 threshold 함수를 사용하여 Otsu 이진화를 다음과 같이 적용할 수 있다.
val src:Mat = ... // 원본영상

// 흑백영상으로 전환
val graySrc = Mat()
Imgproc.cvtColor(src, graySrc, Imgproc.COLOR_BGR2GRAY)

// 이진화
val binarySrc = Mat()
Imgproc.threshold(graySrc, binarySrc, 0.0, 255.0, Imgproc.THRESH_OTSU)
2. 윤곽선 찾기
먼저 윤곽선을 검출하기 위해 findContours 함수를 다음과 같이 호출 할 수 있다.
// 윤곽선 찾기
val contours = ArrayList<MatOfPoint>()
val hierarchy = Mat()
Imgproc.findContours(
    binarySrc,
    contours,
    hierarchy,
    Imgproc.RETR_EXTERNAL,
    Imgproc.CHAIN_APPROX_NONE
)
하지만 윤곽선이 여러개 검출될 가능성이 높으므로, 원하는 영역의 윤곽선을 필터링 하기 위해 몇가지 조건들을 설정한다.
1) 가장 면적이 큰 윤곽선 검출하기
일반적으로 검출하고자 하는 객체(문서)를 가장 큰 피사체로 두기 때문에 가장 큰 면적을 갖는 윤곽선을 검출한다.
// 가장 면적이 큰 윤곽선 찾기
var biggestContour: MatOfPoint? = null
var biggestContourArea: Double = 0.0
for (contour in contours) {
    val area = Imgproc.contourArea(contour)
    if (area > biggestContourArea) {
        biggestContour = contour
        biggestContourArea = area
    }
}

if (biggestContour == null) {
    throw IllegalArgumentException("No Contour")
}
// 너무 작아도 안됨
if (biggestContourArea < 400) {
    throw IllegalArgumentException("too small")
}
2) 근사화하기
윤곽선 근사화를 통해 도형의 꼭짓점을 분명하게 하자.
val candidate2f = MatOfPoint2f(*biggestContour.toArray())
val approxCandidate = MatOfPoint2f()
Imgproc.approxPolyDP(
    candidate2f,
    approxCandidate,
    Imgproc.arcLength(candidate2f, true) * 0.02,
    true
)
3) 사각형인지 판별하기
문서는 일반적으로 사각형이므로 근사화 한 윤곽선이 사각형인지 판별하자.
// 사각형 판별
if (approxCandidate.rows() != 4) {
    throw java.lang.IllegalArgumentException("It's not rectangle")
}

// 컨벡스(볼록한 도형)인지 판별
if (!Imgproc.isContourConvex(MatOfPoint(*approxCandidate.toArray()))) {
    throw java.lang.IllegalArgumentException("It's not convex")
}
3. 투시 변환
투시변환은 OpenCV에서 제공하는 두 가지 함수의 조합을 통해 쉽게 구현할 수 있다.
- getPerspectiveTransform: 원본 영상의 정점과 결과 영상에 적절히 대응되는 정점 입력을 통해 투시변환 매트릭스를 얻는다.
- warpPerspective: getPerspectiveTransform호출로 얻은 매트릭스를 입력으로 하여 원본이미지를 변환한다.
이전과정을 통해 원본 영상에서 사각형의 꼭짓점 4개를 얻었다. 편의를 위해 이 꼭짓점들을 좌표상 좌상단부터 반시계방향 순 배열로 먼저 정렬한다.
// 좌상단부터 시계 반대 방향으로 정점을 정렬한다.
val points = arrayListOf(
    Point(approxCandidate.get(0, 0)[0], approxCandidate.get(0, 0)[1]),
    Point(approxCandidate.get(1, 0)[0], approxCandidate.get(1, 0)[1]),
    Point(approxCandidate.get(2, 0)[0], approxCandidate.get(2, 0)[1]),
    Point(approxCandidate.get(3, 0)[0], approxCandidate.get(3, 0)[1]),
)
points.sortBy { it.x } // x좌표 기준으로 먼저 정렬

if (points[0].y > points[1].y) {
    val temp = points[0]
    points[0] = points[1]
    points[1] = temp
}

if (points[2].y < points[3].y) {
    val temp = points[2]
    points[2] = points[3]
    points[3] = temp
}
// 원본 영상 내 정점들
val srcQuad = MatOfPoint2f().apply { fromList(points) }
변환 할 결과 영상은 문서(사각형)만 포함하는 영상이여야 하므로 문서의 비율(=가로/세로)을 알아야 한다. 정확한 비율은 구하기 힘들기 때문에 원본영상에서 가장 긴 가로길이와 가장 긴 세로길이를 기준으로 비율을 구해본다.
// 사각형 꼭짓점 정보로 사각형 최대 사이즈 구하기
// 평면상 두 점 사이의 거리는 직각삼각형의 빗변길이 구하기와 동일
private fun calculateMaxWidthHeight(
    tl:Point,
    tr:Point,
    br:Point,
    bl:Point,
):Size{
    // Calculate width
    val widthA = sqrt((tl.x - tr.x) * (tl.x - tr.x) + (tl.y - tr.y) * (tl.y - tr.y))
    val widthB = sqrt((bl.x - br.x) * (bl.x - br.x) + (bl.y - br.y) * (bl.y - br.y))
    val maxWidth = max(widthA, widthB)
    // Calculate height
    val heightA = sqrt((tl.x - bl.x) * (tl.x - bl.x) + (tl.y - bl.y) * (tl.y - bl.y))
    val heightB = sqrt((tr.x - br.x) * (tr.x - br.x) + (tr.y - br.y) * (tr.y - br.y))
    val maxHeight = max(heightA, heightB)
    return Size(maxWidth, maxHeight)
}
val maxSize = calculateMaxWidthHeight(
    tl = points[0],
    bl = points[1],
    br = points[2],
    tr = points[3]
)
val dw = maxSize.width
val dh = dw * maxSize.height/maxSize.width
val dstQuad = MatOfPoint2f(
    Point(0.0, 0.0),
    Point(0.0, dh),
    Point(dw, dh),
    Point(dw, 0.0)
)
// 투시변환 매트릭스 구하기
val perspectiveTransform = Imgproc.getPerspectiveTransform(srcQuad, dstQuad)

// 투시변환 된 결과 영상 얻기
val dst = Mat()
Imgproc.warpPerspective(src, dst, perspectiveTransform, Size(dw, dh))
4. OCR 구현 (Tesseract)
광학 문자 인식(OCR;Optical Character Recognition)을 구현하기 위해 Tesseract라는 라이브러리를 사용한다. Tesseract는 1985년~1994년 동안 HP(Hewlett-Packard)에서 개발하고, 2005년도에 오픈소스로 전환했다. 2006년부터는 구글에서 관리하는 라이브러리로 2018년도에 4.0 버전이 릴리즈 되고 LSTM 기반 OCR 엔진 및 모델이 추가되었으며, 현재 100개 이상의 언어 데이터를 제공한다.
여기서는 최신버전의 Tesseract를 포팅하여 안드로이드용 라이브러리로 구현한 Tesseract4Android를 사용한다.
class LanguagePack @Inject constructor(
    @ApplicationContext private val context: Context
) {
    companion object {
        private const val ENG = "eng.traineddata"
        private const val KOR = "kor.traineddata"

        fun getDir(context:Context):File{
            return File(context.filesDir, "tesserect")
        }
    }

    fun initialize() {
        with(
            getDir(context)
        ) {

            val subdir = File(this, "tessdata")
            val engFile = File(subdir, ENG)
            val korFile = File(subdir, KOR)
            if (exists() && subdir.exists() && engFile.exists() && korFile.exists()) {
                return@with
            }
            deleteRecursively()
            mkdir()
            subdir.mkdir()
            engFile.copyFrom(context.assets.open(ENG))
            korFile.copyFrom(context.assets.open(KOR))

        }
    }
}
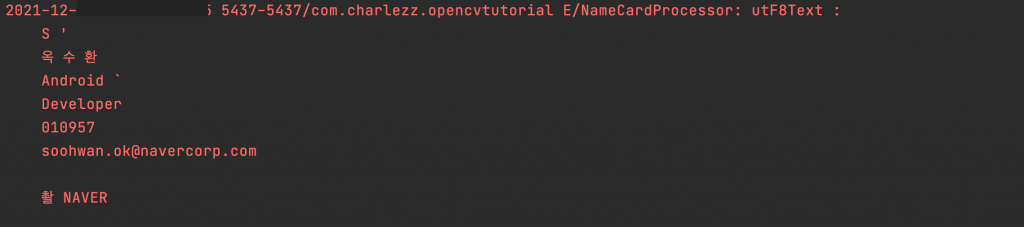
fun printOCRResult(context:Context, src:Mat){
    with(TessBaseAPI()){
        init(LanguagePack.getDir(context).absolutePath, "eng+kor")
        val dst = Mat()
        Imgproc.cvtColor(src, dst, Imgproc.COLOR_BGR2RGB)
        val bitmap = Bitmap.createBitmap(dst.cols(), dst.rows(), Bitmap.Config.ARGB_8888)
        Utils.matToBitmap(dst, bitmap)
        setImage(bitmap)
        Log.e("NameCardProcessor","utF8Text :\n$utF8Text")
    }
}
로그캣으로 tesseract로 인식한 문자 확인하기
4개의 댓글
김태성 · 2022년 2월 3일 12:06 오전
찰스님 안녕하세요.
최근 OpenCV에 관심이 생겨 공부를 하려고 합니다
목차 내용이 좋아서 궁금함이 생기더라구요.
혹시 따로 보고 계신 글이나 책이 있는것일까요?
Charlezz · 2022년 2월 3일 9:15 오후
황선규 박사님의 강의자료 및 도서 ‘러닝 OpenCV3’ 등을 기반으로 포스팅을 작성하고 개인적으로 부족한 지식은 위키피디아를 참고 하고 있습니다.
JY · 2022년 10월 19일 2:56 오후
현재 IntelliJ에서 해당 코틀린 실습을 따라하는 중인데, opencv를 코틀린에서 어떻게 import하신 건지 궁금합니다..!! 아무리 찾아봐도 opencv가 코틀린으로 지원되지않는 것 같아서요…
아뵤 · 2022년 12월 1일 11:19 오전
ocr관련해서 의뢰드리고 싶은데 메일부탁드려요~^^