
KSP(Kotlin Symbol Processing)
KSP(Kotlin Symbol Processing)는 코틀린에서 경량화 된 컴파일러 플러그인을 개발할 수 있는 API다. 학습곡선을 최소한으로 줄이고, 코틀린의 기능을 활용할 수 있는 단순화된 API를 제공한다. KSP는 코틀린 1.4.30 버전 이상부터 호환되며, KAPT와 비교했을 때 KSP를 사용하는 애노테이션 프로세서는 최대 2배 더 빠르게 실행할 수 있다. 자세한 내용은 KSP Github 리포지토리에서 오픈 소스 코드 및 문서를 확인할 수 있다.
Annotation Processor란?
애노테이션 프로세서(Annotation Processor)는 애노테이션에 대한 코드베이스를 검사하거나 새로운 코드를 생성하는데 사용된다. 이 프로세서는 자바 컴파일러 플러그인의 일종으로 개발자의 코드를 단순화 또는 자동화하는데 사용할 수 있다.
안드로이드 개발자로서 자주 사용하는 Room, Dagger, Hilt, Glide 등이 Annotation Processor를 활용하는 대표적인 라이브러리다.
KAPT란?
코틀린 프로젝트를 컴파일 할 때는 javac가 아닌 kotlinc로 컴파일을 하기 때문에 Java로 작성한 애노테이션 프로세서가 동작하지 않는다. 그렇기 때문에 코틀린에서는 이러한 애노테이션 처리기를 위해 KAPT(Kotlin Annotation Processing Tool)를 제공한다.
코틀린 프로젝트에서 KAPT를 사용하기 위해서 build.gradle 파일에 다음과 같은 라인을 추가하면 된다.
// 모듈 레벨의 build.gradle 파일

// kapt 플러그인 적용
apply plugin: 'kotlin-kapt'

... // 기타 생략

dependencies{
  // 기존 annotationProcessor 대신 kapt로 선언
  // annotationProcessor "com.google.dagger:hilt-android-compiler:$hilt_version"
  kapt "com.google.dagger:hilt-android-compiler:$hilt_version"
}
KAPT가 있는데 왜 KSP를 써야하나요?
1. 빠르다
기존에는 코틀린 전용 애노테이션 프로세서가 없었기 때문에, javax.lang.model 패키지에서 제공하는 API를 통해 애노테이션 프로세서를 작성했다. 이 프로세서를 수행하기 위해 KAPT는 코틀린 코드를 자바 스텁(Stub)으로 컴파일하게 된다. 이러한 스텁을 생성하려면 KAPT가 코틀린 프로그램의 모든 기호(symbol)들을 확인해야 한다. 스텁 코드를 생성하는 비용은 컴파일 전체의 1/3을 차지한다.
성능 평가를 위해 KSP에서 Glide의 단순화된 버전을 구현하여 Tachiyomi 프로젝트용 코드를 생성했는데 코틀린 컴파일 시간은 21.55초에서 KAPT가 코드를 생성하는데 8.67초, KSP가 코드를 생성하는데 1.15초가 걸렸다고 한다. KSP의 코드 생성 시간이 약 7배 이상 빨랐다
2. 쉽다
KSP는 코틀린 친화적이다. KSP는 코틀린만의 고유한 기능들인 확장 함수(extension function), 선언 위치 변환 (Declaration-Site Variance), 지역 함수(local functions) 등을 이해한다. 또한 타입을 모델링하고 동등성 및 할당호환성(assign-comppatibility)과 같은 기본적인 타입을 검사하는 기능을 제공한다.
또한 KSP를 이용하여 소스코드를 처리할 때 클래스, 클래스 멤버, 함수 및 관련 매개변수와 같은 내용에 쉽게 접근이 가능하다. 개념적으로는 코틀린 리플렉션의 KType과 유사하다. 그렇기 때문에 커스텀 SymbolProcessor 작성 시 AbstractProcessor와 비교하여 작성이 편하다는 느낌을 받게 된다.
3. 호환성 및 유지보수
KSP는 JVM에 종속되지 않도록 설계되었다. 그렇기 때문에 향후 다른 플랫폼에 보다 쉽게 적용할 수 있다. 또한 컴파일러 변경 사항을 숨기도록 설계되어 이를 사용하는 프로세서의 유지 관리 노력을 최소화 한다.
KSP의 한계점
KSP는 일반적인 유즈케이스에 대한 간단한 솔루션이 되고자 등장했다. 다른 플러그인 솔루션에 비교했을 때 몇가지 절충점(trade-off)이 존재한다.
다음은 KSP의 목표가 아니다.
- 소스 코드의 표현 수준 정보를 조사하기
- 소스 코드 수정하기
- Java Annotation Processing API와 100% 호환하기
- IDE와 통합하기 (현재는 IDE가 생성 된 코드를 읽지 못함)
안드로이드 스튜디오(IDE)에서도 코드를 읽지 못하기 때문에 다음의 경로를 명시해야 한다.
build/generated/ksp/debug/kotlin
build.gradle.kts 예시
android {
    buildTypes {
        getByName("debug") {
            sourceSets {
                getByName("main") {
                    java.srcDir(File("build/generated/ksp/debug/kotlin"))
                }
            }
        }
    }
}
KSP를 이용한 예제 만들기 (Intent 빌더)
KSP를 사용하여 간단한 Intent 빌더 예제를 만들고자 한다. (예제코드)
Intent 빌더는 사용자 Activity가 요구하는 필수 파라미터를 Builder 클래스의 생성자 매개변수로 갖는 빌더 클래스를 의미한다. 이 빌더 클래스를 KSP를 통해 자동으로 생성해보자!
IntentBuilder 예제 프로젝트 설정하기
다음과 그림과 같이 모듈을 만들고, 의존관계를 설정했다.
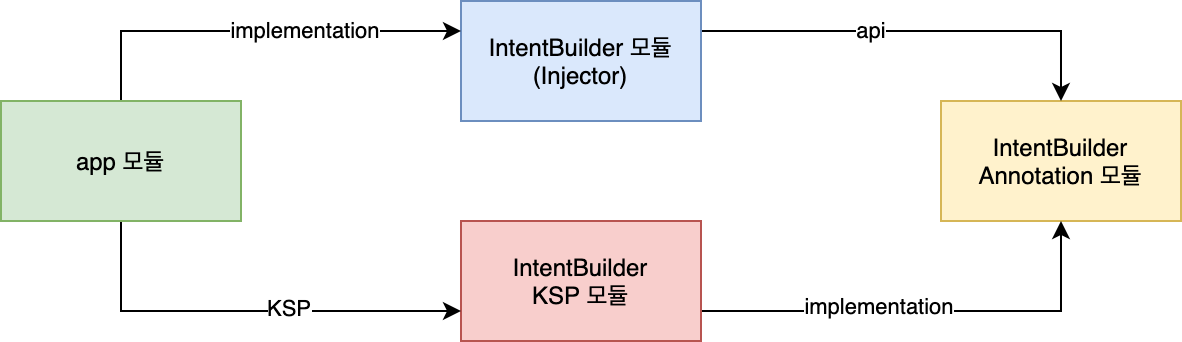
IntentBuilder에 사용하는 Annotation
IntentBuilder annotation 모듈은 코틀린/자바 모듈로 생성했다. 다음과 같은 애노테이션을 정의한다.
@IntentBuilder
타겟 Activity 클래스에 사용. (Activity이름 + Builder) 클래스 생성.
@Extra
타겟 Activity 멤버 필드에 사용. (빌더 클래스의 생성자 매개변수)
IntentBuilder KSP 모듈
ksp 모듈은 코틀린/자바 모듈로 생성했다. 다음과 같이 gradle을 설정 한다.
build.gradle.kts (ksp 모듈레벨)
plugins {
    // 코틀린 플러그인 적용
    kotlin("jvm")
}


repositories {
    mavenCentral()
    // google() 리포지토리를 추가하여 해당 플러그인을 찾을 수 있도록 한다.
    google()
}

dependencies {
    //KSP API를 사용하기 위해 아래의 의존성을 추가
    implementation("com.google.devtools.ksp:symbol-processing-api:1.5.20-1.0.0-beta04")
}
설정이 정상적으로 끝났다면 SymbolProcessor와 SymbolProcessorProvider를 구현해야 한다.
SymbolProcessorProvider
SymbolProcessor를 반환하는 create() 함수를 갖는 인터페이스. KSP에 통합되어 플러그인에 의해 사용된다.
fun interface SymbolProcessorProvider {

    fun create(environment: SymbolProcessorEnvironment): SymbolProcessor
}
SymbolProcessor
심볼 프로세싱을 위해 다음과 같은 3가지 메서드를 갖는 인터페이스다.
interface SymbolProcessor {
    /**
     * resolver는 SymbolProcessor에 심볼(애노테이션)과 같은 컴파일러 세부 정보에 대한 접근을 제공한다.
     * 이 함수에서는 프로세서가 수행할 수 없는 유예된 심볼 목록을 반환한다.
     */
    fun process(resolver: Resolver): List<KSAnnotated>

    /**
     * 최종적인 단계. 프로세싱을 마무리짓는다.
     */
    fun finish() {}

    /**
     * 라운드 수행 후 에러를 처리
     */
    fun onError() {}
}
다음과 같이 IntentBuilderProcessor와 IntentBuilderProcessorProvider를 구현했다.
class IntentBuilderProcessor : SymbolProcessor {

    companion object {
        private val intentBuilderName = IntentBuilder::class.java.canonicalName
    }

    // 코드 생성기
    private lateinit var codeGenerator: CodeGenerator
    // 로그 출력기
    private lateinit var logger: KSPLogger

    fun init(
        codeGenerator: CodeGenerator,
        logger: KSPLogger
    ) {
        this.codeGenerator = codeGenerator
        this.logger = logger
    }

    override fun process(resolver: Resolver): List<KSAnnotated> {
        logger.warn("IntentBuilderProcessor 시작")

        // getSymbolsWithAnnotation을 통해 원하는 심볼을 가져와 작업을 수행할 수 있다.
        val symbols:Sequence<KSAnnotated> = resolver.getSymbolsWithAnnotation(intentBuilderName)

        val ret = symbols.filter { !it.validate() }

        // IntentBuilderVisitor에게 작업을 위임한다.
        symbols
            .filter { it is KSClassDeclaration && it.validate() }
            .forEach { it.accept(IntentBuilderVisitor(codeGenerator, logger), Unit) }
        return ret.toList()
    }

    override fun finish() {
        logger.warn("IntentBuilderProcessor 끝")
    }

    override fun onError() {
        logger.error("IntentBuilderProcessor 에러")
    }

}

class IntentBuilderProcessorProvider : SymbolProcessorProvider {
    override fun create(environment: SymbolProcessorEnvironment): SymbolProcessor {
        return IntentBuilderProcessor().apply {
            init(environment.codeGenerator, environment.logger)
        }
    }
}
기본적으로 KSVisitor 인터페이스를 구현하여 작업을 수행할 수 있다. 위 코드에서는 KSVisitor를 구현한 IntentBuilderVisitor를 작성하여 KSP 수행시 특정 Activity를 위한 IntentBuilder 클래스 코드를 구현하도록 했다.
예제코드라 내용이 많이 부실한 것을 감안해야 한다.
class IntentBuilderVisitor(
    private val codeGenerator: CodeGenerator,
    private val logger: KSPLogger
) : KSVisitorVoid() {


    override fun visitAnnotation(annotation: KSAnnotation, data: Unit) {
        super.visitAnnotation(annotation, data)
        logger.warn("visitAnnotation = $annotation")
    }

    override fun visitAnnotated(annotated: KSAnnotated, data: Unit) {
        super.visitAnnotated(annotated, data)
        logger.warn("visitAnnotated = $annotated")

    }

    override fun visitClassDeclaration(classDeclaration: KSClassDeclaration, data: Unit) {
        logger.warn("@IntentBuilder -> $classDeclaration 발견")

        val candidates = ArrayList<KSPropertyDeclaration>()

        // 후보군 선정
        for (property in classDeclaration.getDeclaredProperties()) {
            for (annotation in property.annotations) {
                if (annotation.shortName.getShortName() == Extra::class.java.simpleName) {
                    logger.warn("@Extra -> ${property.parentDeclaration?.simpleName?.asString()}::${property.simpleName.getShortName()} 발견")
                    candidates.add(property)
                    break
                }
            }
        }

        val packageName = classDeclaration.packageName.asString()

        //빌더 만들기
        makeBuilderFile(packageName, classDeclaration, candidates)

        //파서 만들기
        makeParserFile(packageName, classDeclaration, candidates)
    }

    override fun visitFunctionDeclaration(function: KSFunctionDeclaration, data: Unit) {
        logger.warn("visitFunctionDeclaration = $function")
    }

    private fun makeBuilderFile(
        packageName: String,
        classDeclaration: KSClassDeclaration,
        candidates: ArrayList<KSPropertyDeclaration>
    ) {

        val className = "${classDeclaration.simpleName.asString()}Builder"
        val file: OutputStream = codeGenerator.createNewFile(
            dependencies = Dependencies(true, classDeclaration.containingFile!!),
            packageName = packageName,
            fileName = className
        )

        file.appendLine("package $packageName")
        file.appendLine("")
        file.appendLine("import android.content.Intent")
        file.appendLine("import android.content.Context")
        file.appendLine("")
        file.appendLine("class $className(")

        // 생성자 매개변수 만들기
        file.appendLine("\tprivate val context:Context,")
        for (candidate in candidates) {
            file.appendLine(
                "\tprivate val ${candidate.simpleName.asString()}: ${
                    candidate.type.resolve().toString()
                },"
            )
        }
        file.appendLine("){")
        file.appendLine("\tfun build(): Intent {")
        file.appendLine("\t\treturn Intent(context, ${classDeclaration.qualifiedName?.asString()}::class.java).apply {")

        // Extra삽입

        for (candidate in candidates) {
            file.appendLine("\t\t\tputExtra(\"${candidate.simpleName.asString()}\", ${candidate.simpleName.asString()})")
        }

        file.appendLine("\t\t}")
        file.appendLine("\t}")
        file.appendLine("}")
        file.close()
        logger.warn("$className 파일 생성 완료")
    }

    private fun makeParserFile(
        packageName: String,
        classDeclaration: KSClassDeclaration,
        candidates: ArrayList<KSPropertyDeclaration>
    ) {
        // 파서 만들기
        val className = "${classDeclaration.simpleName.asString()}Parser"
        val file: OutputStream = codeGenerator.createNewFile(
            dependencies = Dependencies(true, classDeclaration.containingFile!!),
            packageName = packageName,
            fileName = className
        )

        file.appendLine("package $packageName")
        file.appendLine("")
        file.appendLine("class $className(")
        file.appendLine("\tprivate val activity:${classDeclaration.simpleName.asString()}")
        file.appendLine("){")
        file.appendLine("")
        file.appendLine("\tfun parse(){")
        file.appendLine("\t\tval intent = activity.intent")

        for (candidate in candidates) {
            when (candidate.type.resolve().toString()) {
                "String", "String?" -> {
                    file.appendLine("\t\tactivity.${candidate.simpleName.asString()} = intent.getStringExtra(\"${candidate.simpleName.asString()}\")?:\"\"")
                }
                "Int", "Int?" -> {
                    file.appendLine("\t\tactivity.${candidate.simpleName.asString()} = intent.getIntExtra(\"${candidate.simpleName.asString()}\",0)")
                }
            }
        }

        file.appendLine("\t}")
        file.appendLine("}")

        file.close()
        logger.warn("$className 파일 생성 완료")

    }

}

fun OutputStream.appendLine(str: String) {
    this.write("$str\n".toByteArray())
}
거의 모든 준비가 끝났다. SymbolProcessor 코드 작성 후에는 컴파일러에게 해당 프로세서의 SymbolProcessorProvider를 등록해줘야 한다.
다음과 같은 경로에 파일을 생성하여 등록 할 수 있다.
resources/META-INF/services/com.google.devtools.ksp.processing.SymbolProcessorProvider
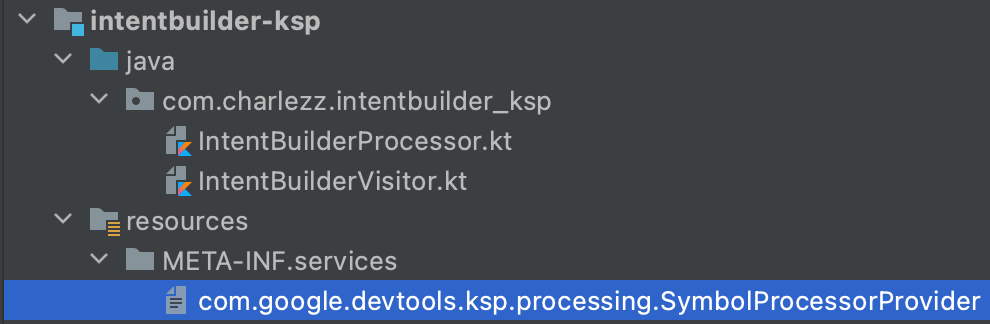
해당 파일내에 작성한 SymbolProcessorProvider의 canonical 이름을 다음과 같이 명시한다.
com.charlezz.intentbuilder_ksp.IntentBuilderProcessorProvider
IntentBuilder 예제 실행하기
app모듈의 build.gradle을 다음과 같이 설정한다.
plugins {
    id("com.android.application")
    kotlin("android")
    id("com.google.devtools.ksp")
}


android {
    compileSdkVersion(Dependencies.compileSdk)
    buildToolsVersion(Dependencies.buildToolVersion)

    defaultConfig {
        applicationId("com.charlezz.intentbuilder.sample")
        minSdkVersion(Dependencies.minSdk)
        targetSdkVersion(Dependencies.targetSdk)
        versionCode(1)
        versionName("1.0")
    }

    buildTypes {

        getByName("debug") {
            sourceSets {
                getByName("main") {
                    java.srcDir(File("build/generated/ksp/debug/kotlin"))
                }
            }
        }
        ...
    }
    ...
}

dependencies {
    ...
    implementation(project(":intentbuilder"))
    "ksp"(project(":intentbuilder-ksp"))

}
다음과 같이 name과 age를 필요로 하는 UserActivity를 만들었다.
@IntentBuilder
class UserActivity : AppCompatActivity() {

    @Extra
    var name: String? = null

    @Extra
    var age: Int = 0

    ...

}
컴파일 이후 UserActivityBuilder와 UserActivityParser가 생성된 것을 확인할 수 있다.

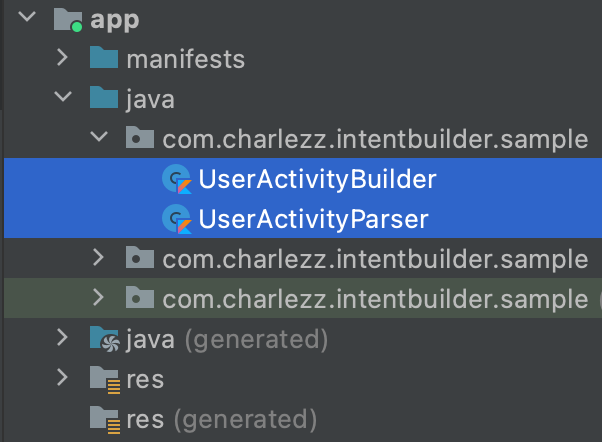
생성된 코드로 UserActivity를 다음과 같이 호출 할 수 있다.
class MainActivity : AppCompatActivity() {

    override fun onCreate(savedInstanceState: Bundle?) {
        super.onCreate(savedInstanceState)
        setContentView(R.layout.activity_main)

        findViewById<Button>(R.id.submit).setOnClickListener {

            val name = findViewById<TextInputEditText>(R.id.input_name).text.toString()
            val age = findViewById<TextInputEditText>(R.id.input_age).text.toString().toIntOrNull()?:0

            // UserActivityBuilder를 이용한 인텐트 만들기
            val intent:Intent = UserActivityBuilder(this, name, age).build()

            // UserActivity 액티비티 호출
            startActivity(intent)
        }

    }
}
마치며
현재 KSP는 beta 스테이지이기 때문에 성급히 프로덕트에 적용할 필요는 없을 것 같다. 하지만 대규모 프로젝트에서 애노테이션 프로세싱을 하고 있거나 혹은 KSP의 강력한 성능을 맛보고 싶다면 지금 당장 시작해보는 것도 나쁘지 않다.
현재 KSP를 지원하는 오픈소스 라이브러리는 Room, Moshi, Kotshi, Lyricist 등이 있다. 추후 Hilt나 Glide같은 곳에도 적용될 예정이다.

1개의 댓글
Steve · 2021년 8월 13일 4:32 오후
KSP alpha부터 사용하고 있는데, 쉽게 잘 설명해 놓으셨네요.
감사합니다!